This is a sponsored conversation written by me on behalf of Cricut. The opinions and text are all mine.
Give your friends something to talk about this Valentine’s Day and host an adorable Conversation Heart Valentine’s Day Party!
Conversation Hearts are an iconic candy staple for Valentine’s Day. Whether you love them or hate them there is no denying they make the perfect decorations for a party!
Those sweet little candies have been Valentine’s Day cliche since 1902, and their witty messages have been making Valentine’s Day sweeter ever since. I decided to bring these iconic little candies to life and create the perfect party backdrop for a sweet celebration.
I used my Cricut to create quick and easy decorations to help you spread the love this Valentine’s Day. The oversized Sweethearts candy box makes the perfect photo booth prop filled with DIY conversation heart balloons.
Love comes in all shapes and sizes. And with Cricut, anyone can become a Valentine’s Day match-MAKER and party expert! Follow the directions below to create your own classic Valentine’s Day party decorations perfect for classroom parties, play dates, or family celebrations.
Cricut Conversation Heart Party Decoration Supplies
- Cricut Explore Air 2
- 2 – White 3D Trifold Project Board 39 x 48
- Standard Grip Mat
- Conversation Heart Party SVG
- Cricut Cardstock Sorbet
- Cricut TrueControl Knife
- Red Vinyl
- Heart Balloons
- Decoart Lipstick Red Acrylic Paint
- Decoart Bubble Gum Acrylic Paint
- Clear Cellophane Wrap
- Packing Tape
How to Make Conversation Heart Party Decorations
Step 1
Open up Cricut Designs Space and the Conversation Heart Party SVG. Here you will find all of the elements you need to create the conversation heart balloons, the templates for the candy box, and the conversation heart backdrop candies.
Step 2
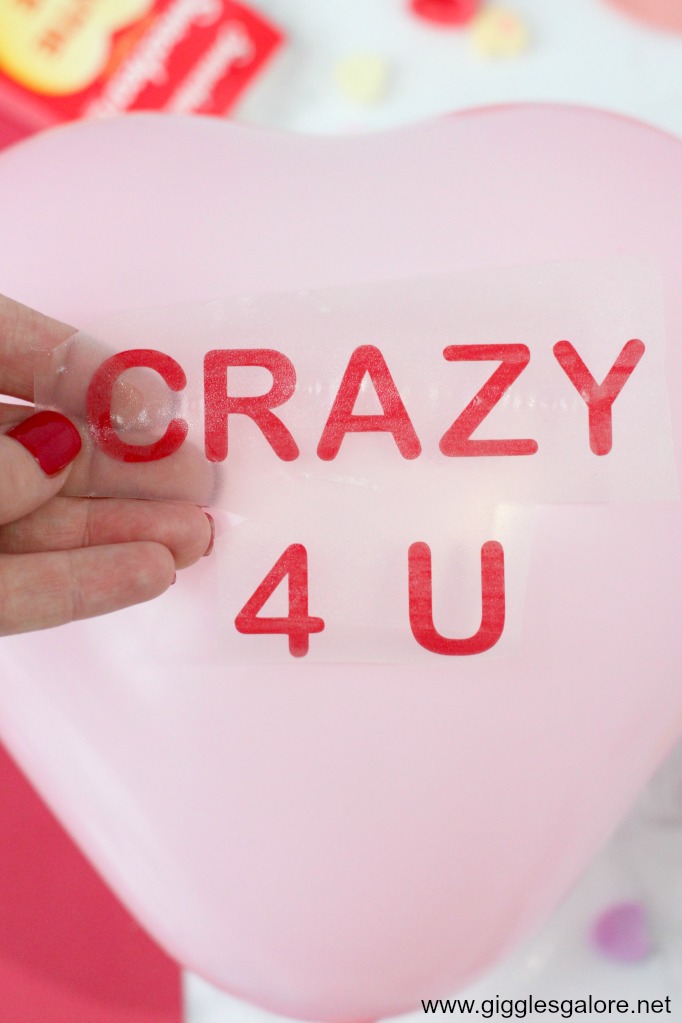
Start by cutting out the vinyl sayings for your conversation heart balloons in red vinyl. Apply transfer tape to the vinyl sayings and peel them back to reveal your design.
Step 3
Blow up the heart balloons and tie them.
Step 4
Carefully apply the vinyl sayings to each balloon. Make sure to gently rub the saying onto the balloon and go slowly as you remove the transfer tape so the balloons don’t pop.
Step 5
Now it’s time to create the box for your conversation hearts. Begin by cutting out 2 of the large 18″ half heart templates on cardstock. Once the pieces are cut out, match them up and secure with a piece of washi tape to create a large heart.
Step 6
Place the heart in the center of one of the tri-fold boards and trace around it.
Next, follow the same steps above but with the 16″ heart and trace that in the center of the 18″ heart. This will be the innermost heart and the part that you cut out.
I wanted a double heart border so I ended up freehanding another heart about 2 ” apart from the largest heart (the first 18″ heart you traced) to create the white border.
Step 7
Use the Bubble Gum acrylic paint and paint the entire board pink, except for the hearts you’ve just traced.
Step 8
Paint the inner border of the heart with the Lipstick Red acrylic paint.
Step 9
Use the TrueControl Knife to cut out the center of the heart. Turn the board over and cover the hole left with the cellophane wrap and use packing tape to secure it to the board.
Step 10
Customize the candy box by adding the vinyl saying “sweethearts” to the top of the box and in the bottom corner add the weight and heart stickers.
Step 11
Now it’s time to put your box together. Fold both boards and fit them together to form a rectangle box, tape them together on the inside.
Step 12
Fill the box with the conversation heart balloons.
DIY Conversation Heart Party Backdrop
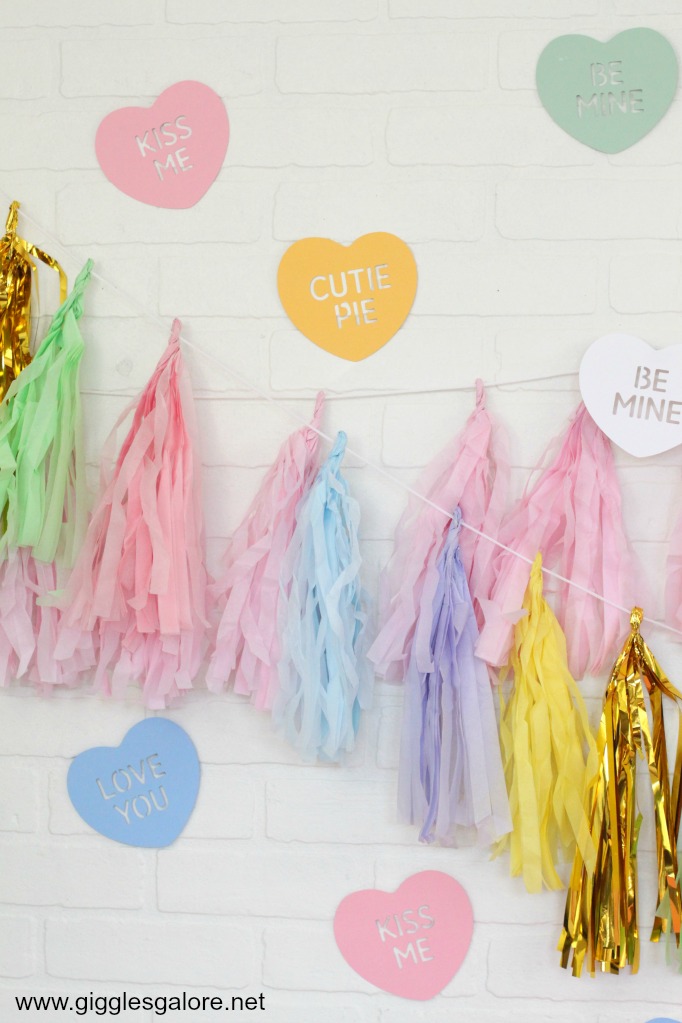
Create a candy-colored backdrop for your new giant box of Sweetheart Conversation Candy. Cut out a variety of conversation hearts from the sorbet cardstock.
Hang a pastel tassel garland and then tape the cardstock conversation hearts to the wall all around.
Use your cute new backdrop and giant conversation heart candy box to take photos with your sweet valentine!
For more witty conversation heart inspired projects be sure to check out these other ideas:
DIY Conversation Heart Gift Box











Is there a video on this?
Hi Theresa, I don’t have a video on this particular post, but if there is something specific you are looking for or need help with let me know and I’ll be happy to see what I can do. Thanks!
How do you place the 2 boards to make it. I can’t figure it out
Hi Connie, are using 2 tri-fold boards? You will fold the sides of the tri-fold on each board and basically match them up on the inside to create a box. I used heavy-duty tape to tape them on the inside. I did not have a bottom to my box since I didn’t plan to move it around, but you can add a bottom, you would just need to cut a piece of cardboard to fit the bottom and tape it to the tri-fold boards. I will try to create a video tutorial and post it on my IG page that shows exactly how I put the box together, but feel free to send me an email if you have any other questions.
Hey Mariah! Fun project! Could you please tell me what you used for the top and bottom of the box. Did you cut off the tri fold ends and cut them to size or use another piece of cardboard? Thank you!
Hi Sarah,
I used a piece of cardboard that I cut down to size and secured to the top, but I actually left the bottom open since I wasn’t moving my piece around. I simply put it where I wanted it and then filled it with the balloons and closed the top. But, you could also use a piece of cardboard on the bottom as well.
Hi Mariah-
This is absolutely adorable!!…Thank you so much for sharing this AND the SVG’s with us!! This is amazzzing!!
I do have one question; as I’ve just got out my 18” heart and I’m just a bit confused on what to do next-
From what I gather, the 18” heart is biggest most outer layer (white). Then we are to cut/trace “the 16” heart” which I’m not seeing in design space. So I duplicated the 18” heart & changed it’s height to 16” at which point I realized I needed to change the width as well. (It wasn’t fitting evenly into the 18” heart). So I just subtracted 2” from the width also.
Now here’s where I’ve gotten completely derailed-
This second 16” heart is to go in the “center of the 18 inch heart”….
I assume the “center” would be the next red heart that’s in the middle. But then you mention free handing the 3rd heart to create the border, which I assumed was the smallest heart that we’re to cut out. But the “border” thing is throwing me off and that smallest heart looks like it’s much farther away from the 18” heart than 2”. So now I’m wondering if I have it backwards….
Perhaps the 16” heart is the smallest one that we’re to cut out and you free handed the white one which does have more of a border I guess.
Orrrrrr do I have this all wrong??!! Lol
It’s very possible I’m overthinking this. As I tend to do that a lot.
Anyways, I really hope I’m making sense here and I’d soooo appreciate it if you could help clear this up for me.
Thanks again so much for your time!
xxoo Kristen
Hi Kristen,
I just looked back at the instructions and can see that they were a little confusing, so thanks for reaching out. Here is what you need to do to recreate the box with the same dimensions as I did.
1. Cut out an 18″ heart using the Cricut SVG
2. Cut out a second 16″ heart, by resizing the Cricut SVG.
3. You will first trace the 18″ heart in the center of the board.
4. Next, you will place the 16″ heart in the center of the heart you just traced and trace around that pattern. This will be the inner heart that you cut out.
5. I wanted a double border for the hearts so I free-handed a 2″ border on the outside of the first 18″ heart that I traced. So if you think in terms of it as layers you would have a 20″, 18″ and 16″ hearts layered on top of each other to create the 2″ borders. The reason I freehanded the larger heart is that you are limited to how large you can cut the shapes on the Cricut.
6. Next, I painted the board. Keep in mind you will actually be painting both the 18″ and 16″ hearts you traced red, but the 16″ heart will be cut out. I found it was just easier to paint it all at once.
7. Once you have all of the hearts traced, you will cut out the inner heart, which is the 16″ heart, this will be the opening that you cover with the cellophane.
I hope that helps, but if not and you still need help or clarification feel free to reach out via email.
I don’t have a circuit but love this box. Is it anyway you would make all the circuit letters hearts and sell it. I could make the box and balloons. I just need the circuit stuff printing out. Also how do you put the 2 boards together can I see the front back and side of box. Thanks in advance. I would need 2 copies of the circuit prints.
I’m unable to pull this up in cricut. Is it still available?
Hi Kandy, you should be able to access the Cricut Design File using this link, https://design.cricut.com/landing/project-detail/5e3bb868d4032c06ad70f2f4. If you continue to have problems please send us an email or reach out via DM on IG and we will be happy to help. Thanks!