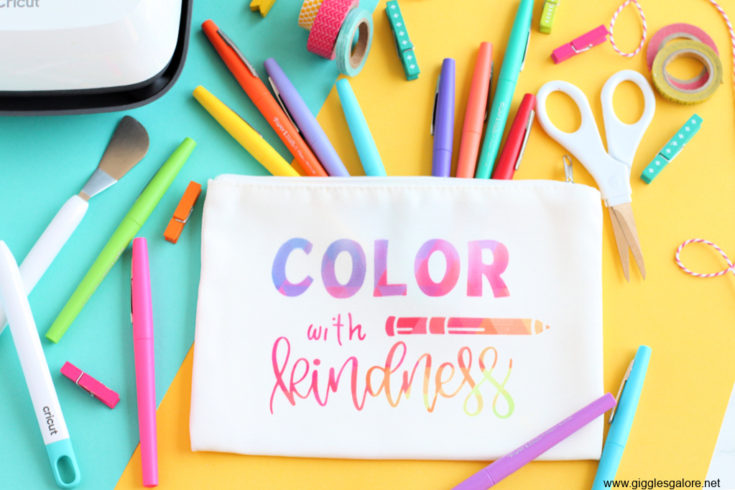
Heading back to school this year looks very different than it ever has, but one thing hasn’t changed and that’s the fact that we still need kindness. In fact, maybe we need it more than we ever have. I’m excited to show you how I created this super easy DIY Color with Kindness Pencil Bag with Cricut Infusible Ink.

Shopping for school supplies is one of my favorite things about the start of a new school year. I love wandering the colorful aisle filled with folders, pens, markers, and backpacks. My oldest daughter loves school supplies too and has acquired quite the collection of flair pens. I quickly realized we were going to need a smart way to contain them.

This year our kids will engage in a hybrid learning environment. Which means they will spend part of the time on campus and part of the time at home. We are going to need lots of systems and tools in place to keep us organized. This DIY pencil bag is the perfect solution for keeping all of her pens in one place that can easily be transported back and forth to school.
How to Make Color with Kindness Pencil Bag
Are you ready to take your school supplies to the next level? With Cricut’s Infusible Ink and the new lineup of Infusible Ink Blanks you can customize your school supplies in a fun and creative way.

Get vibrant, permanent, pro-quality heat press transfers – no edges or seams – on this compatible Infusible Ink blank. Unlike an iron-on transfer or vinyl application, where artwork is attached on top of a compatible material using adhesive, an Infusible Ink heat transfer becomes one with the material itself. The results are bright, beautiful, seamlessly smooth transfers that are flake-proof, peel-proof, and wash-proof.

Cricut Infusible Ink Supplies
- Cricut Maker or Cricut Explore cutting machine
- Standard Grip Machine Mat
- Cricut EasyPress 2 or Cricut EasyPress
- Cricut EasyPress Mat
- Cricut apparel blank (Compatible with Infusible Ink)
- Infusible Ink Transfer Sheet
- Butcher paper
- Cardstock (80 lb.), White (colored cardstock not recommended)
- Lint roller
- Scissors
- Tweezers
- Design Space software on mobile device or computer
- Color with Kindness SVG
Color with Kindness Pencil Bag Tutorial
Step 1: Place Infusible Ink Transfer Sheet onto the Standard Grip mat, liner side down. I used the patterned rainbow triangle transfer sheets for my design.

Step 2: In Design Space, open the Color with Kindness SVG and size to fit on your bag blank. Hit the Make button and be sure to mirror your design.

Step 3: Select browse all materials, then Infusible Ink Transfer Sheet. Load the mat into the machine, then press the flashing Go button.
Step 4: Once the image is finished cutting unload the transfer sheet and weed your design. Start by removing it from the mat and trimming away any unused areas of the sheet. Gently roll the cut design so the lines separate and are more visible. Make sure your fingers are dry if weeding with fingers. You may want to reach for your weeding tool, but “cracking” the cut this way will make it easier to remove excess paper from in and around your design. Trim the clear liner so it does not extend beyond the Cricut EasyPress heat plate.

Step 5: Preheat the Cricut EasyPress 2 to 385° F.
Step 6: Place your bag on top of the Cricut EasyPress mat and then position a trimmed sheet of white cardstock inside the bag to protect both your mat and project.

Step 7: Use a fresh adhesive lint roller to lint roller the entire surface of the bag. DO NOT SKIP THIS STEP. Even tiny little fibers can create imperfection in the transfer. Next, place the design face down on the Cricut Blank.

Step 8: Cover the design with the butcher paper and set the EasyPress 2 to 385° F for 60 seconds. Gently place the press on top of the project and keep the stack as still as possible while pressing, do not slide or move your hands during transfer.

Step 9: Let your project cool slightly and then slowly remove the butcher paper, and the liner with the design to reveal your colorful Color with Kindness design.

Step 10: Fill your new pencil bag with colorful markers, pencils, or pens, and don’t forget to spread kindness along the way!

Customized Projects with Cricut Infusible Ink
Color with Kindness Pencil Bag with Cricut Infusible Ink
Materials
- Cricut apparel blank (Compatible with Infusible Ink)
- Infusible Ink Transfer Sheet
- Butcher paper
- Cardstock (80 lb.), White (colored cardstock not recommended)
- Lint roller
- Scissors
- Tweezers
- Design Space software on mobile device or computer
- Color with Kindness SVG
Tools
- Cricut Maker or Cricut Explore cutting machine
- Standard Grip Machine Mat
- Cricut EasyPress 2 or Cricut EasyPress
- Cricut EasyPress Mat
Instructions
- Place Infusible Ink Transfer Sheet onto the Standard Grip mat, liner side down. I used the patterned rainbow triangle transfer sheets for my design.
- In Design Space, open the Color with Kindness SVG and size to fit on your bag blank. Hit the Make button and be sure to mirror your design.
- Select browse all materials, then Infusible Ink Transfer Sheet. Load the mat into the machine, then press the flashing Go button.
- Once the image is finished cutting unload the transfer sheet and weed your design. Start by removing it from the mat and trimming away any unused areas of the sheet. Gently roll the cut design so the lines separate and are more visible. Make sure your fingers are dry if weeding with fingers. You may want to reach for your weeding tool, but “cracking” the cut this way will make it easier to remove excess paper from in and around your design. Trim the clear liner so it does not extend beyond the Cricut EasyPress heat plate.
- Preheat the Cricut EasyPress 2 to 385° F.
- Place your bag on top of the Cricut EasyPress mat and then position a trimmed sheet of white cardstock inside the bag to protect both your mat and project.
- Use a fresh adhesive lint roller to lint roller the entire surface of the bag. DO NOT SKIP THIS STEP. Even tiny little fibers can create imperfection in the transfer. Next, place the design face down on the Cricut Blank.
- Cover the design with the butcher paper and set the EasyPress 2 to 385° F for 60 seconds. Gently place the press on top of the project and keep the stack as still as possible while pressing, do not slide or move your hands during transfer.
- Let your project cool slightly and then slowly remove the butcher paper, and the liner with the design to reveal your colorful Color with Kindness design.
- Fill your new pencil bag with colorful markers, pencils, or pens, and don't forget to spread kindness along the way!
Cricut has always been one of my favorite craft tools and it’s no surprise why. They continue to create innovative products that seamlessly work together to create projects that are a reflection of you and your personal style. I am so excited about the new Cricut Infusible Ink transfer sheets Cricut Infusible Ink Blanks and can’t wait to see how this new product will inspire you!

Be sure to check out all of the Cricut Infusible Blanks and Infusible Ink transfer sheet designs. What project will you create first with the new Cricut Infusible Ink Blanks?


Leave a Reply