It should come as no surprise that I am a big fan of Cinco de Mayo. A celebration centered around bright colors, Mexican food and margaritas is my kind of celebration! Every year we like to host a little Cinco de Mayo celebration with friends and this year I went with a colorful Chippin’, Dippin’ and Margarita Sippin’ theme. To set the tone for our party I created colorful DIY Cinco de Mayo invitations with my Cricut.
One of my favorite things about owning a Cricut is the ability to access over 60,000 images in the image library and 1000 of pre-made projects in Design Space. I love having the ability to create my own projects from scratch, but when I’m running short on time, or creativity, I can search the project data base to help get me started. I found this adorable Cinco de Mayo invitation and thought they would be perfect for our upcoming party.
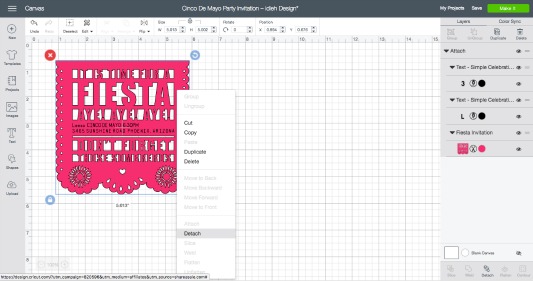
It is super easy to customize any project in Design Space, simply click on the customize tab to open up the project in Design Space. Once the project is open simply click on the text to update the invitation with your party details and information.
I have always believed that the little details are what set the tone for your party and take it from ordinary to extraordinary. Sending fun invitations help to get your friends excited about the party and let them know what they can look forward to. In addition to cutting out these fun invitations with my Cricut I decided to put them in a fun piñata fringe box and deliver them. You too can create, fun, colorful and personalized invitations for your party.
What You Will Need:
- Cricut Explore Air 2
- Cinco de Mayo invitation via Cricut Design Space
- Cricut Tools
- Colorful cardstock
- 6 x 6 box
- Colorful paper streamers
- Scissors
- Hot glue gun
Step 1:
Open up Cricut Design Space and this project file, click on the “customize” tab. Once you have the project open right click on the image and select “detach”, this will allow you to customize the text for your invitation.
Step 2:
Double click on each line of text to edit your text with your own custom party details. Once you have finished editing your invitation select the entire image and click on the “attach” button in the lower right hand corner. Click on the Make It button and cut out your invitation on colorful cardstock.
Step 3:
Use the Cricut tools to remove the invitations from the mat and weed out any small pieces of paper still left.
Step 4:
Now that you have the invitation, it’s time to create the piñata fringe box to put them in. Take the lid of your box and measure around the box lid with a piece of the paper streamer and then cut several stripes of each color.
Step 5:
Fold the streamer in half from top to bottom. Use the scissors and snip small sections of the streamer to create the fringe. Here’s a tip: fold the streamer in half length wise a couple of times to make this step go even faster.
Step 6:
Begin wrapping the box with your fringe streamers, placing a small dab of glue in sections as you go to help keep it in place. Layer the fringe colors on top of each other until you have completely covered the top part of your box lid.
Step 7:
Fill the bottom of your box with colorful paper shred and place your invitation inside the box. Put the piñata fringe lid on top and deliver to your friends for a colorful and fun surprise!
This is a sponsored conversation written by me on behalf of Cricut. The opinions and text are all mine.


These are really adorable!
Thanks so much!
These are so perfect! My son will be turning one next May (on Cinco de Mayo!) so I will be using these! Just one question, is there any way for me to change the aye! aye! aye! to say uno! uno! uno! I know it is a premade template but wasn’t sure if it was possible to edit that!
Hi Carli, That sounds like a darling idea for a birthday party! If you have a Cricut machine you should be able to edit this invitation in Cricut Design Space and change the text to uno! uno! uno! You will just need to click “customize” when you select this invitation and it should let you do it.
Hello,
Do I pay for the file before I am able to edit?
Hi! Yes, you have to purchase the file before you can edit it. Once you purchase the file you own it and can use it (and edit it) as much as you would like.