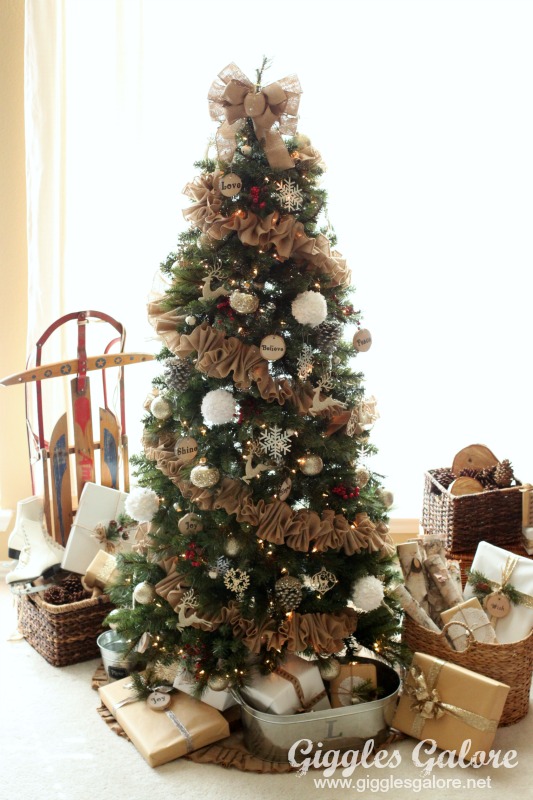
Add a touch of rustic whimsy to your Christmas Tree with this easy DIY Ruffled Burlap Garland Tutorial. It makes a bold statement and adds texture and character to your Winter Wonderland Christmas Tree.
I participated in the Michaels Dream Tree Challenge and created what I liked to call my Rustic Reindeer Christmas Tree. This tree is where I first featured this easy DIY burlap garland. The inspiration behind this tree was everything that I imagined you would find in the reindeer’s barn at the North Pole. From snowballs and jingle bells to wooden logs and Rudolph’s shiny red nose. This sophisticated yet cozy tree is the perfect mix of natural elements with just the right amount of glam.
One of my favorite elements of my Dream Tree, which by the way was also featured on Country Living, is the ruffled burlap garland. This was such a simple project to create, but it helps set the tone for this simple tree and I also used it on my Winter Woodland tree.
How to Make Burlap Christmas Tree Garland
So, today I wanted to share with you how to create this incredibly easy burlap garland. And while this is a very simple tutorial I’d recommend that you get in your cozy PJs, play some Christmas music, or watch your favorite TV show because it does take a little bit of time to pull it all together.
Supplies:
Natural Burlap Garland Tight Weave
Fine Hemp Twine or Jute Thread
Step 1: Thread your needle with the twine thread, you’ll need about half the length of your roll of burlap garland.
Step 2: Tie a knot at the end, it’s best if you go through the surged seam at the end to make sure the knot holds and doesn’t pull through the burlap.
Step 3: Now thread your needle up and down through the burlap about 1-2 inches apart each time. You can use long stitches and it doesn’t have to be perfect. In fact, I found that if I went in a slight zig zag pattern when threading my needle it made my ruffles prettier.
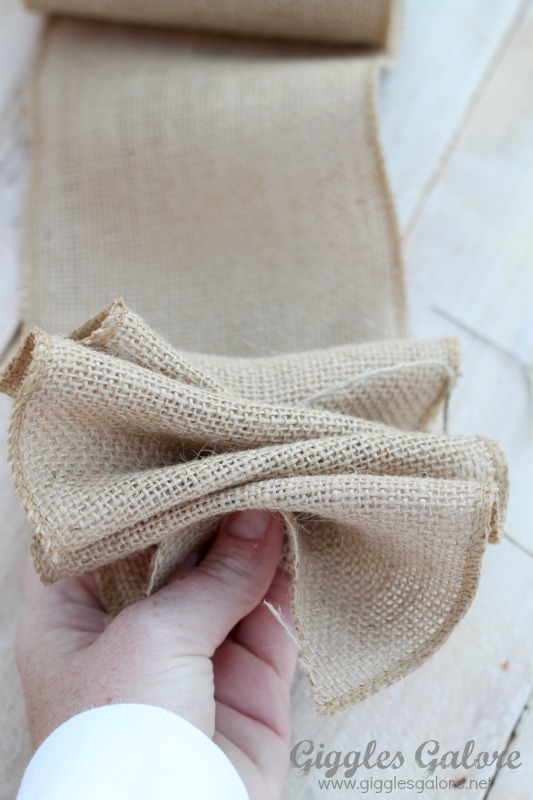
Step 4: Gently pull the burlap and scrunch it down as you continue to work through the entire roll of burlap. Don’t worry about making it pretty just yet, just keep scrunching until you reach the end of the roll.
Step 5: Once you reach the end of the roll, tie a knot, and then start to gently pull and fluff until you have pretty ruffles. Continue making ruffles with the rolls of burlap and once you have them all complete you can attach them together to make your ruffled burlap garland for the Christmas tree.
Decorating With Burlap Garland
Tip: I used safety pins to attach two sections of ruffles together, it was easier to work with and get it positioned right on the tree rather than having 1 giant long strand of garland to work with.
Start at the top of your tree on one side and weave the garland in a spiral pattern down the tree. Once you reach the bottom go to the other side of the tree and do the same so that you have a beautifully woven ruffled garland spiraling down your rustic and glam Christmas tree.
For my 7 ft Christmas tree I used 8 rolls of the Burlap Garland. This may vary depending on how full and fluffy you want your ruffle garland to be. Just play around with the ruffles until you get the desired look you want.
You can help spread some holiday cheer by sharing and pinning a photo of my Winter Woodland Dream Tree. Looking for something a little more whimsical, or maybe more traditional? Be sure to check out my Letters to Santa-themed tree and my Glam Metallic Farmhouse Christmas tree.


I love how elegant and simple this is.
I can’t believe how easy these are to make! Maybe I should say how easy they “appear” to be to make! 🙂 I saw someone do this the other day, and bought the supplies to try it myself. Let’s see if it still seems easy when I am finished giving it a try! 🙂 #totallyterrifictuesday
You can absolutely do it, it’s easy peasy! Just put on a good movie and you’ll be done in no time. 🙂
Love the look of this! Thanks for sharing.
Thank you Beth!
Oh, I love this. I have taken burlap and sewed lights inside of it, but I love this idea and your tutorial was great.
Thanks for sharing at Turn It Up Tuesday,
Be
Thank you Beverly! I love the idea of sewing lights inside the burlap, I may have to give that a try too!
This is so darling! Just had to let you know your burlap garland is my feature this week on the DIY Sunday Showcase this week, Super job!
Thanks so much, we can’t wait to check out this weeks DIY Sunday Showcase!
Can you do this type of garland design with wired ribbon?
Yes, Absolutely! If the wire is too stiff once you make the ruffle you may need to just twist the ribbon a bit to get it to gather the way you want.
Such a simple yet great tutorial! After a Christmas tree mishap last year that resulted in broken ornaments and scratched I decided to look for a different way to decorate this year. I fell in love with this garland as soon as I saw it, and I think it’s just what I’ve been looking for! Can’t wait to make it this weekend.
I love this DIY burlap garland. How beautiful and classy. Thanks for the tutorial.