National Ice Cream Day is on July 17th and I’m planning a fun family party to celebrate. While that may seem like a ways off, it’s never to early to start thinking about, or taste testing, ice cream if you ask me. In addition to some very yummy homemade ice cream recipes and a fun family game, I thought it would be cute to have a few party accessories to really make it an extraordinary celebration. This DIY Melting Ice Cream Cone Headband is the perfect accessory for any ice cream themed party or occasion.

Coincidentally, my challenge for FloraCraft® Make It: Fun® involved using the foam cones and they inspired me to create this cute and fun DIY Melting Ice Cream Cone Headband.

This is a fairly simple project to create and you should be able to complete this project in 30-45 minutes. Here is what you will need:
- FloraCraft® Make It: Fun® Foam 6″ Cone
- FloraCraft® Make It: Fun® Foam 4″ Ball
- FloraCraft® Foam Tools
- FloraCraft® StyroGlue®
- FloraCraft Smooth Finish®
- Fine Sandpaper
- DecoArt Acrylic Paint
- Paint Brushes
- Construction Paper
- Felt
- Headband
- Hot Glue Gun and Glue

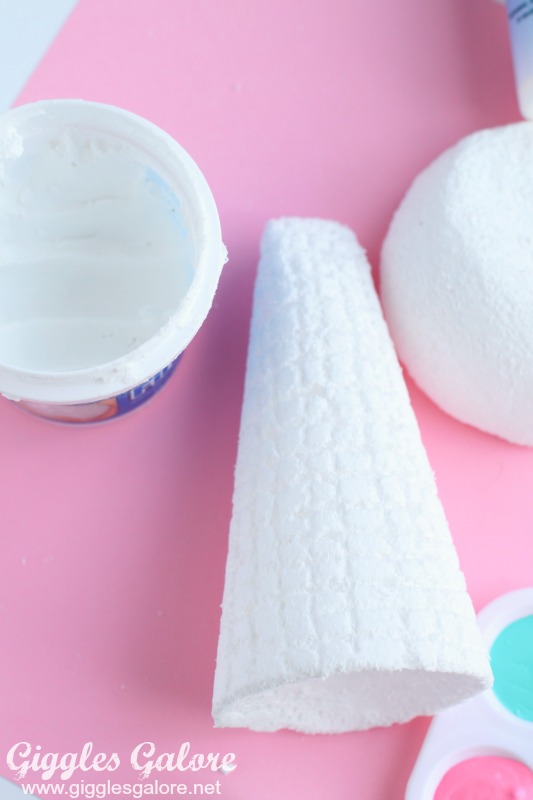
- Start by using the Foam Cutter to slightly trim off the bottom corners of the cone to give it a more realistic cone shape.
- Next, cut the foam ball in half and smooth out the cut edge with your foam tools.

- In order to get my cone to sit perfectly on the foam ball I placed it on top where I wanted it to go (slightly off center, because after all it is supposed to look like melted ice cream) and them moved it back and forth in a circular motion to make an indent in the cone. This helped it fit together perfectly.

- Next, take the FloraCraft Smooth Finish® and apply it to both the cone and the ball. You will probably need several coats to make it smooth, make sure you let each layer dry before applying the next. (**This was my first time using this product and I don’t feel like I mastered getting a perfectly smooth finish, but I think the key is making sure that each layer is completely dry before applying more.**) After you have applied the finish and it is dry take a piece of fine sandpaper and smooth out any rough spots.

- Once the smooth coat was dry I took the FloraCraft® Foam Tools and gently scrapped vertical and horizontal lines in the cone to create a waffle cone look.
- Now it’s time to paint your ice cream pieces. I used my favorite acrylic paint, DecoArt to paint the ice cream cone and the melted ice cream.

- While the paint is drying cut out a melted puddle on your color coordinated piece of construction paper.
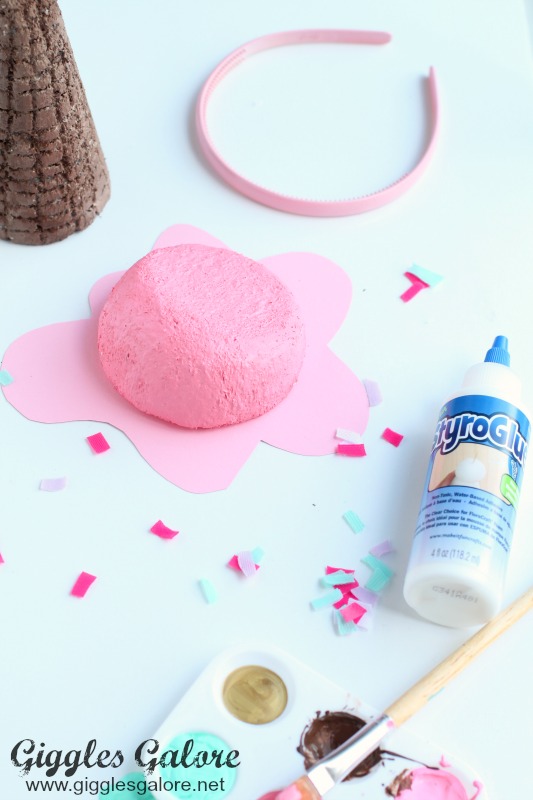
- Once the paint is dry you can attach your ice cream pieces together. First, attach the melted “scoop” of ice cream to the melted “puddle” using the FloraCraft® StyroGlue®. Next, add the cone to the top of the ice cream “scoop.”

- Don’t forget bout the sprinkles! Cut felt into tiny sprinkle sized pieces and attach them to the ice cream with the FloraCraft® StyroGlue®.

- Finally, attach your melted ice cream to your headband with a small piece of felt and the hot glue gun.

- Now, step back and admire your creative efforts. Isn’t this the cutest little party hat you’ve ever seen?!?

I am in love with how this fun little headband turned out and like the fact that we can save it and use it again for future ice cream themed socials if we want to. I made this for my daughter to wear, but I’m tempted to keep it for myself! It’s just so darn cute.
This DIY Melting Ice Cream Cone Headband is the perfect accessory for your summer celebration and a great way to turn an ordinary ice cream party into an extraordinary one!

Disclosure: This post was sponsored by FloraCraft® Make It: Fun®. While I was compensated to write a post about my experience with their products, all opinions and creative ideas are my own.


So clever and cute!! Holly
Thank you Holly, it is the perfect party hat for an ice cream party!
this is so adorable!! love it!
Adorable! Would be fun for a kids party or…Thanks for sharing at the #InspirationSpotlight party. shared.
This is so creative. I love this!
I remembered this craft and came to look it up. I made two for an event we are having at school. Thanks so much!!
That is awesome, thanks for sharing Amy! Hope they turned out great for your event!