I love collecting globes and have several of them displayed throughout my house. I’ve always loved the beautiful painted versions that I see floating around Pinterest, but I’ve never been able to bring myself to paint one of my globes. After all every single one I’ve purchased I’ve loved it for it’s unique character or color, I just can’t imagine altering it to try out a current trend. I found a way to satisfy my obsession with globes and get that custom painted look I admire with my own DIY Faux Globe.

This month when I received my surprise box of FloraCraft goodies I found lots of FloraCraft® Make It: Fun® Foam balls. I thought of lots of different ways that I could use the ball to create pretty home decor, but nothing was really jumping out at me, that is until I was working on plans for my kids playroom. We are doing an adventure theme and I thought that a painted globe with the saying “Adventure Awaits” would be perfect for the space, but I just couldn’t bring myself to paint one of my current globes. Then it dawned on me, I could make my own with the FloraCraft® Make It: Fun® Foam balls.

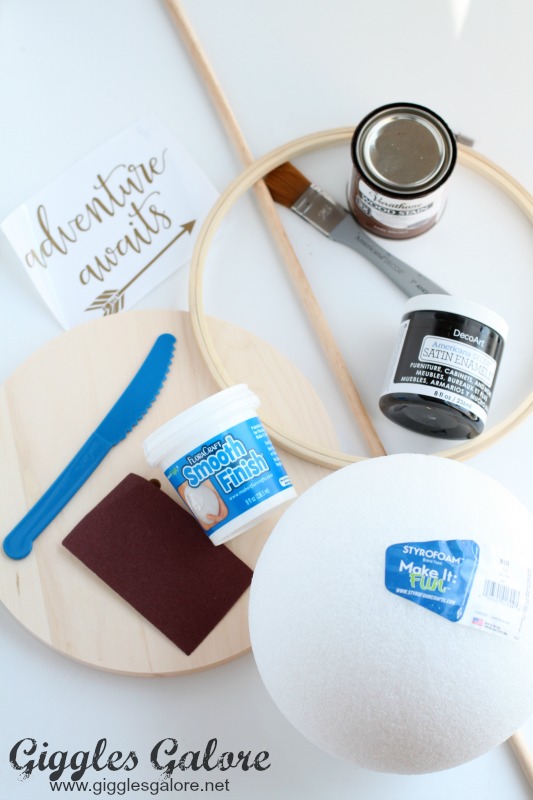
Here is what you’ll need for this project:
- 8″ FloraCraft® Make It: Fun® Foam
- Round Clock Base
- 10″ Embroidery Hoop
- 3/8 Wooden Dowel
- Smooth Finish
- Wood Stain
- Paint
- Cricut
- Gold Vinyl
- Transfer Tape
The steps to complete this project are very simple, however this will require a tiny bit of patience and a little bit of time.
- Paint your clock base, embroidery hoop, and wooden dowel with the wood stain. Wipe away an excess and let the stain dry.

- While the stain is drying on your wood pieces it’s time to start creating your faux globe. Use the smooth finish to create a smooth, paintable layer on the FloraCraft® Make It: Fun® Foam ball. This is where you’ll need a little bit of patience. You will need to work slowly and let the smooth finish dry between layers. I ended up doing 3 layers of the smooth finish to get the surface of my globe as smooth as possible.

- Once the smooth finish has dried you can start to sand out any rough spots or edges.

- Next, insert the wooden dowel into the center of the ball and push it all the way through. This will make it easier to paint.

- The next step is to paint your faux globe with your desired paint color.

- Let the paint dry completely and then add your vinyl saying. I used my Cricut to create and cut this design, but if you don’t have a cutting machine you could use stickers, or even your own handwriting using a paint pen.

- Next, insert the end of the wooden dowel into the wooden clock base.
- Finally, it’s time to add your embroidery hoop. I drilled a hole through my wooden dowel so that I could secure the hoop to the rod. I also added a dab of hot glue to the top of the wooden dowel to keep the top of the embroidery hoop secure and in place.

I am so in love with my new, trendy DIY faux globe. I love it’s size, color and the vinyl saying. The only problem is now I want to keep it downstairs in my living room and keep it on display on my bookshelf, instead of putting it in my kids playroom!

What do you think, would you make your own DIY Faux Globe or would you just bit the bullet and paint an old globe?

You may also want to check out a few of these great tutorials for DIY Crafts:


Yes! So brilliant and adorable!
Thanks so much Krista!
That’s a GENIUS idea!
I absolutely love this idea!!! Will definitely need to make a faux globe of my own!
Thank you Erin, I just couldn’t paint any of my globes so this was a great alternative.
This is great! Thanks for the tutorial!
This is so cute!! I love it…now I’m off to find supplies!!
Thank you so much, it’s a fun project to make if you don’t want to use the real thing.
Wow, this totally looks like a real globe! What a great idea. Thanks for the awesome tutorial, I pinned this to my Crafts board because I’d love to try it one of these days.
Hope you will stop by and link up your blog post at this week’s #HomeMattersParty (it’s open Friday to Monday)
This is slightly genius!! I have wanted to create one of these globes, but didnt have the heart to ruin my globe. Now I dont have to! Love it!
Thank you Sara, it is a great alternative if you are like me and just can’t paint your vintage globe. We would love to see how your version turns out!
I love it. I’m not sure I’d have the patience to wait for it to dry.
Yes, that part is a little tricky if you are an ADD crafter like me. 😉
Wow! This is an incredible DIY! I love it! Definitely need to go an get the materials to make one for my home! Thanks so much for this tutorial.
Thank you for the sweet comment Marie, and if you do make one make sure that you stop back by and share your version!
Love the globe; what a great idea!
Thank you so much Linda, we appreciate your sweet comment.
Wow- what a great idea! I totally want to make one!
Thank you Candice. You should totally give it a try and if you do make sure you share it with us, we love seeing how other people projects turn out! 🙂
Such a great idea to make a faux globe! And the way you styled it is just perfect! Nicely done!
Thank you Kristen.
I love this! I do have a globe in which the paper is peeling off so you can’t see pretty much the entire west coast and bits of the oceans are missing buuuut, I still don’t know if I’d paint over it. I like you’re thinking outside the box idea to achieve a similar look and plus, yours is so unique! Thanks for sharing at Funtastic Friday!
Thank you Angie, it was a fun project to create and it looks great in my kids adventure themed play room.
I have seen so many ideas for old globes, but I’ve looked in all the thrift stores, and I can’t find any. This is a great solution–I can make my own. Now I just need to decide which globe makeover project to try first. Thanks for the great tutorial.
Thank you Rebecca, it’s a fun way to get that trendy look without having to commit to searching high and low for an expensive vintage globe. I’d love to see how your project turns out. 🙂
This is awesome! I had been wondering about modpodging vintage map images I printed off on the computer. But this is one less step! Thanks for sharing!